facebook

Sunday 21 December 2014

Green Tea Cupcakes


For some odd reason, I went from not being a cupcake-eater at all to ultimate obsession - in particular with diverse flavours (I don't think I've ever even made plain vanilla cupcakes). So today, let's feel green. The recipe is dedicated to Martina who absolutely adored these cupcakes.

If you do not have matcha green tea powder (I myself have only recently come into possession of it), just use some other Japanese green tea (Sencha, Gyokuro) and try to pulverise it as much as possible. The colour will not be quite as bilious, but the taste is just as good.

Ingredients (makes 24):
For the dough:
240g flour
1/4 tsp salt
1/2 tsp baking powder
340g caster sugar
170g butter
2 large eggs
10ml milk
2 tbsp matcha green tea powder (or crushed sencha or gyokuro tea leaves)

For the topping:
200g butter
200g Philadelphia (or any other cream cheese)
600g icing sugar
1 tbsp matcha green tea powder

Preparation:
Preheat the oven to 175ºC. Mix together the dry ingredients (flour, salt, baking powder and matcha powder). Place the butter into a separate bowl and beat until soft (do not melt it!) and then add the caster sugar. Mix the two until you obtain a pale and fluffy mass. Add the eggs and sift in the dry mix. Add the milk. Fill the cupcakes forms until 2/3 full and bake for 15-20 minutes until the tops are soft to the touch and a toothpick comes out clean. 
While baking the cupcakes, put the Philadelphia in a bowl and beat until creamy. Place the butter and 1/3 of the icing sugar into a separate bowl and mix until fluffy. Sift in the rest of the sugar and matcha powder and at the end, add the cream cheese. Chill until ready to pipe, then decorate the cupcakes!


 photo arrow.pngCONTINUE READING

Monday 1 December 2014

Homemade Müesli (Granola)


This post has been sitting in my drafts for a very long time and it just didn't want to be published... But then, what better way to start a weekend than with a homemade muesli? Hence why this draft now finally makes it onto my blog... And I have to admit, it brings back lovely memories of the colourful and tasty Iraqi pomegranates (I would bet that they are amongst the best in the world, if not the best).


Ingredients:
1 cup of rolled oats (I just used Quaker oats)
1 cup of rolled buckwheat groats
2 cups puffed oats (the ones that look like "Smacks")
5 tbsp. honey (the liquid kind)
3 tbsp. coconut oil (liquid)
1 vanilla pod (scratched out seeds)
1 tsp. cinnamon
Pinch of salt
Handful of crushed almonds
Handful of crushed walnuts
Handful of dried apricots 

Preparation:
Preheat the oven to 150°C and line a baking tray with baking paper. Do not overheat your oven as you are guaranteed to burn your granola (yes, speaking from experience)! Combine dry ingredients (oats, salt and cinnamon) in a bowl. In a separate bowl, mix the oil with the honey and vanilla seeds. Then combine the two - best done with your hands and massaging the honey into the oats until they are evenly mixed. Spread out the mixture onto the baking tray, using a spatula to ensure that it is spread evenly. Put the tray into the oven and bake the mixture for 30 minutes, stirring it every 10 minutes so that it doesn't burn (again, trust me, it happens). After 30 minutes add the chopped apricots and nuts and put the tray back into the oven for another 10-15 minutes. Do not add dried fruit or nuts earlier as they will burn (I feel like I am repeating myself here…)! Once the granola looks golden and crunchy, take the tray out and let the mix cool down so it can clump. Finally, put the Müesli in airtight containers (like glass jars for example) for storage.

I always add fresh fruit to my granola just to make it a little less dry. These days, it's mostly pomegranate as the season has really started here. The best pomegranates in Northern Iraq come from Halabja, allegedly. I think I will abstain from speculating why that would be…


 photo arrow.pngCONTINUE READING

Wednesday 26 November 2014

Mini Mulled Wine Cupcakes


And because the wintery season has even arrived in Suly, here the recipe for some seasonal cupcakes - mulled wine!

Ingredients (makes 24):
For the dough:
120g butter
120g caster sugar
1 pinch of salt
Zest of 2 clementines
120g flour
1 1/2 baking powder
1/2 tsp. ground cinnamon
1/8 tsp. groun nutmeg
1/4 tsp. ground cloves
2 medium eggs
8 tbsp. red wine
6 tbsp. clementine juice
30g sugar
1/2 cinnamon stick
3 cloves
1 star anise

For the frosting:
100g cream cheese
100g butter
250g icing sugar
Zest of 1/2 clementine

Preparation:
Preheat the oven to 175°C. Mix the (soft) butter, sugar, salt and zest in a bowl and mix until pale and fluffy. In a separate bowl, sift together the flour, baking powder and spices. In a third bowl, lightly beat the eggs, then add them to the butter mix while beating quickly. Then add the flour and lastly 2 tbsp. wine. Fill the mini cupcake forms with batter (2/3 full) and bake for 15-18 minutes (until the tops spring back to the touch and a toothpick comes out clean). 

In a small saucepan, mix together 6 tbsp. of wine and clementine juice and add the 30g sugar and spices. Bring to the boil, stir until the sugar has dissolved, then set aside to infuse. Brush the still warm cupcakes with the syrup and keep the rest for the frosting.

Meanwhile, prepare the frosting by placing the cream cheese in a bowl and beating it until smooth and creamy. In a separate bowl, mix the (soft) butter with 1/3 of icing sugar and cream until pale and fluffy. Continue adding the rest of the sugar, then add the cream cheese. At the end, mix in the zest and remaining syrup. Decorate the (cooled) cupcakes with the topping.


 photo arrow.pngCONTINUE READING

Friday 14 November 2014

Pumpkin & Goat's Cheese Ravioli


I found this very yummy-looking recipe of pumpkin-goat's cheese ravioli online and since pumpkin season is in full swing even in Northern Iraq, I spontaneously decided to try it out. The original recipe is with canned pumpkin, but since that doesn't exist here, I just used fresh pumpkin - probably better anyway! And to be honest, the result completely surprised me since I really did not expect to produce yummy pasta the first time I ever tried it. So the recipe is fool proof.

So let's get started!

Ingredients (for roughly 2 portions):
For the dough:
200g all purpose flour
1 egg
3 tbsp olive oil
60ml water
1/4 tsp salt

For the filling:
100g fresh pumpkin
75g goat's cheese
2 cloves of garlic
3 tsp white wine
Rosemary or sage (depending on your taste)
Salt and pepper
Olive oil
Water

For the sauce:
20g butter (yes!)
1 tsp lemon juice
Rosemary

Preparation:
Firstly, prepare the dough as it will need time to rest. Beat the egg in a bowl and add the water, oil and salt. Then add the flour while continuously combining the ingredients. Knead the dough until you obtain a soft mass. Place the dough back in the bowl and cover it with cling film. Let it chill for 1-2 hours.
In the meantime, cut up the pumpkin in cubes and press or chop the garlic. Heat some olive oil in a frying pan and add the garlic and pumpkin. Sauté the two until the garlic starts to brown, then deglaze with the white wine. Season with salt, pepper and rosemary (or sage). When the white wine is absorbed, place the pumpkin in a pyrex, drizzle with olive oil and bake it in the oven until it is soft, approximately 20 minutes at 200°C. Once the pumpkin is soft, put it in a bowl and add the goat's cheese. Purée with a food processor and season (if needed) with salt, peper and more rosemary. Then take the dough out of the fridge and roll it out. I have a pasta machine to help me make the dough evenly thin. If you do not, just roll it out (on a floured surface) until it is about 2-3mm thin. Avoid to make all the dough at once at it easily dries out. The cut the pasta in lengths, place 1tsp.-sized filling in regular intervals (estimate the size of your ravioli) onto the strips, moisten the edges and place a second strip on top. Then press around the filling heaps with your fingers, cut the parcels into ravioli and go around the edges with a fork to seal the pasta strips together. The pasta is ready to be cooked immediately. Otherwise, you can place it in plastic bags in the freezer (separated from each other so they don't stick). To cook them, bring water to the boil in a pan, add salt and cook the ravioli until they float on the surface. In a frying pan, heat the butter until it starts to brown. Add the rosemary and lemon juice and pour it over the fresh ravioli. Buon appetito!
 photo arrow.pngCONTINUE READING

Monday 3 November 2014

Homemade Torsade Bread


When living abroad, finding "good" bread is often one of the biggest challenges. Now, as good, I, Swiss and European, would define bread that is crunchy, but not necessarily a baguette. Sourdough is yummy. Not so much the toast bread other nations' people seem to prefer. In Kurdistan you can get the toast bread, the baguette, the flatbread and a bread which they call "samoun"- diamond shaped breads. I even found an article on them online.

I like samoun, but they're not the kind of bread I feel like eating all the time, hence the quest to find an easy recipe for a homemade version. And I might just have come across the easiest recipe on the planet: the no-knead bread as presented by the New York Times.

The first time I made it, my oven (I am in Iraq, remember) gave up on me and the hot temperatures. So I had to shuffle my bread between my own kitchen and the one in the office. And between an electric and not-so-well-functioning-gas oven. Result: the bread was ok, but not great. So since them, I am putting the temperature not at maximum, but just at 220°C (as is suggested in the article). And the result looks pretty neat:


I have slightly changed the measurements, also converting them into the metric system. This conversion business also reminds me to get cracking on my own conversion table. Not just for myself, but also for you people. Maybe you appreciate not having to google everything ;-).

Now, let's get started on the bread.

Ingredients (for two small loafs, roughly 20cm long):
350g all purpose (i.e. white) flour - you can change that according to your preference, or in my case, availability
1 tsp salt
1/3 tsp yeast (dry)
350ml water (room temperature)

Preparation:
Mix the dry ingredients in a bowl. Then add the water. Mix well, but stop when the water is absorbed. Do not knead (that's the whole purpose!). Cover the bowl with a kitchen towel and let the dough rest for at least 12 hours, but preferably more.

Once the dough is ready, pre-heat the oven to 220°C and place a pyrex (with cover) in it. Cut the dough into tow and put the first half on a surface covered with flour (the dough will be very sticky). Roll is, softly, in the flour and then twist it. Place it in the pyrex and put the cover back on. Bake for 30 minutes, then remove the lid and bake for an additional 20 minutes, until the crust is brown and crunchy. Et voilà! It really couldn't be easier.

 photo arrow.pngCONTINUE READING

Sunday 19 October 2014

Figues Confites (Kurdish Fig Jam)


In an attempt to collect as many Kurdish recipes as possible before leaving Iraq (that is, I am doing a pre-selection for your here… I don't think there is much appetite for sheep-head stew…), I am now prompting my office staff to come up with the recipes for yummy home-made dishes. So here is another one: fig jam - or as I call it figues confites. Perfect for the season and really easy to make!

Ingredients:
1kg fresh figs
1kg sugar
2L water
Cinnamon sticks (to your liking)
Cardamom pods (whole) (also to your liking)
Lime juice

Preparation:
Fill a cooking pot with the water and add the sugar, cinnamon sticks and cardamom seeds and bring it to the boil. Once the water is boiling, add the figs and cook them for about 2 hours until the syrup starts to thicken. Add lime juice (approximately 1 tsp) and then let it cool down before storing it in jars or pots. Voilà! Best with some cured cheese and some crunchy bread. 
 photo arrow.pngCONTINUE READING

Tuesday 14 October 2014

Dolma (Vine Leaves) - Kurdish Version


I could live off vine leaves. In fact I once did just that for an entire weekend when my kitchen was being re-done. So my cook (sounds fancy, but it's just part of the deal here at work) made me a pot of dolma which I devoured. I don't know what it is about the combination of rice and some green leave (get the hint?) that makes me so addicted. But I have definitely developped a new crush here. And so I shall share the recipe with you - homemade vine leaves.
I will not dwell here on who "invented" the vine leaves or dolma or dolmades or whatever they are called in all these different places. I like the Lebanese version (with pickled leaves outside and tomatoes inside). But I love the Kurdish version with yoghurt and fresh leaves.
I will try to also put up the recipe of another kind of dolma: the ones prepared with different vegetables (courgette, peppers, onion and even potatoes) and Swiss chard. But for now: the vine leave version:

Ingredients (for 3-4 hungry persons):
250g rice (short grain)
125g vine leaves (preferably fresh)
A bunch of (thin) spring onions (roughly 20 pieces)
A good bunch of dill
250g yoghurt
3 tbsp. sunflower oil
1/2 L water
1 tbsp. salt

Preparation:
Wash the fresh ingredients as well as the rice in cold water. Chop the spring onions and dill finely and mix it with the yoghurt, rice and sunflower oil. Place the vine leave (with the lighter side up) on your palm and place about 1 tsp of the mixture in the middle (the amount depends on the size of the vine leaves - small ones are better as they are much softer). Then fold the leaves four ways: left, up, right and down until you have a little, almost square parcel. Put these parcels seam-side down into a pan and pile them tightly. Once all the rice is used up, pour the rest of the liquid over the piled parcels. Then cover them with the water and place a plate on top so that the dolma don't start floating (and thus opening) during the cooking process. Place a lid on the pan so that the air can escape (i.e. don't cover the pan entirely). Cook the vine leaves on mid-flame until the water has evaporated (you can check this by tilting the pan slightly). Then reduce the heat, cover the pan completely and simmer for 10-15 additional minutes. When the time is up, turn the pan upside down onto a plate and serve hot. You can serve some herbs (mint, parsley, etc.) on the side - it lightens the taste!

 photo arrow.pngCONTINUE READING

Thursday 1 May 2014

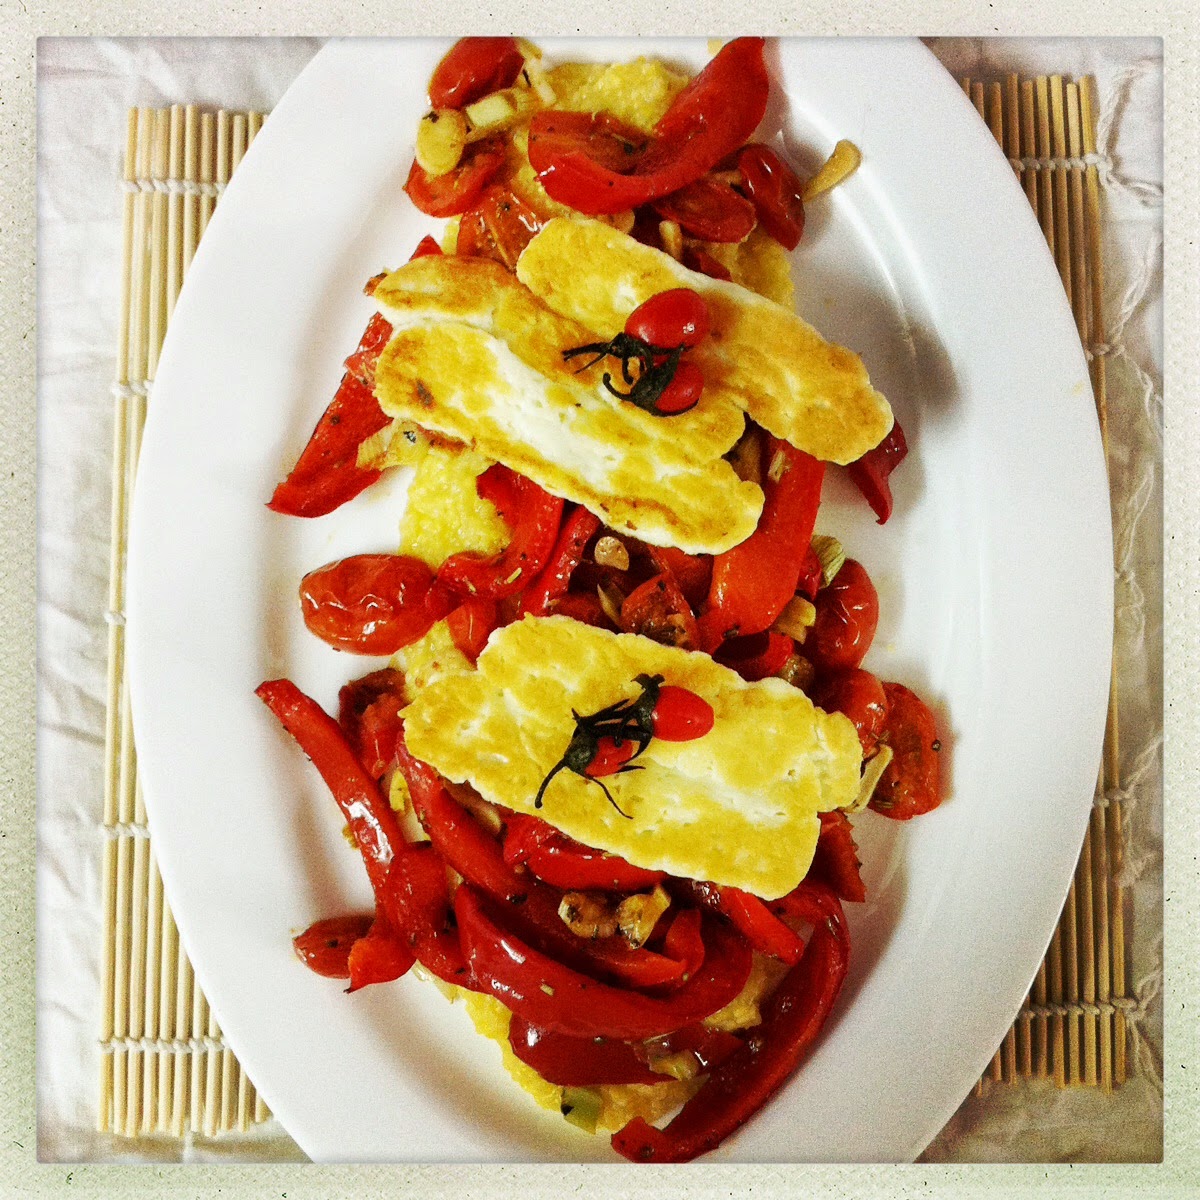
Oven-roasted Vegetables with Halloumi

Hm, after an almost 6-months silence on this blog, I don't think a lengthy explanation of why there hasn't been any post is particularly helpful. Let's just keep it short: I moved to Iraq in the meantime and have been busy with other things. This has however not kept me in the least from continuing to cook and discovering new cuisines (to be frank, there is not much to discover here). Hence it was just the action of transcribing my activities into posts that was missing.
Many people here have actually encouraged me to continue the efforts and thus I start with renewed motivation (and resolution).

This first recipe came along rather on its own. I was surfing through recipes on the internet and came across the idea to roast carrots in the oven. Somehow, I had never even thought of doing that. And since that discovery, I have been subjecting all kinds of vegetables to the oven-tanning treatment. Today it's zucchini and cauliflower. Two days ago it was capsicum and tomatoes. You can pretty much use any vegetable you like. In this recipe, I have added polenta and halloumi cheese in order to give the dish more substance. For those of you who do not know about polenta and/or halloumi, let me explain.

As Wikipedia describes it, polenta is "cornmeal boiled into porridge". Depending on the type , polenta can have a creamy texture (a bit like mashed potato) or be rather grainy (called "bramata" and looks like bulgur). Personally, I prefer the grainy, rougher texture. Polenta is frequently eaten in the Italian part of Switzerland (I actually assumed that this was its geographical origin but have discovered that it is also part of the Italian cuisine). Polenta can either be eaten right after preparing it (when it is still creamy) or it is baked, fried or grilled after a night in the fridge. Again, personally, I prefer to eat it fried crunchy in a deep layer of butter. 

Halloumi (or Halloum) is, as my grandmother calls it, "the cheese that doesn't melt". Originally from Cyprus (I would claim it is Lebanese, but don't shoot me), halloumi is a very salty (because brined), unripened cheese made of a mixture of goat, sheep and cow milk. Because of its high melting point, it can be fried or grilled without losing its form. 

So, after this introduction to the ingredients, let's start with the recipe!

Ingredients (for 2 hungry persons; if you have polenta leftovers, use them the next day):
125g polenta bramata
60cl water
1 beef-cube (can be chicken or vegetarian of course)
200-250g Halloumi
Vegetables of your choice (2 zucchini or 8 small carrots or 1 capsicum or 2 tomatoes or a handful of cherry tomatoes or half a cauliflower...)
2 cloves of garlic
Olive oil, salt, pepper and herbs (such as basil, oregane or rosemary; include mint, if you prepare zucchini)

Preparation:

Bring the water to the boil and add the polenta and the beef-cube. Let it simmer (with the lid on, but stirring regularly) for about 40 minutes. The polenta should still be slightly grainy, but no longer "al dente".
While the polenta is cooking, cut the vegetables into thin slices (cut the carrots in half lengthwise for example). Then place them in a pyrex tray (try not to "crowd" them) and season with olive oil (be generous), garlic (cut thinly) and the herbs. Then put the tray in the oven (pre-heated at 200°C) and roast the vegetables for about 20-30 minutes (check regularly). When the vegetables are already quite tanned, cut the halloumi in slices roughly 7mm thick and place them in a non-sticky frying pan. The cheese will start sweating at first, then will turn brown. Flip it to grill both sides. If the cheese is too salty, soak it in water for a couple of hours before using it.
Serve the polenta with the vegetables and halloumi. If you have decided to wait another day to fry the polenta (this is best done by storing the polenta in a tupperware so that it is formed into a block), cut the polenta in slices of about 1cm thickness. Place a significant amount of butter (20g) in a frying pan and fry the polenta for at least 10 minutes on each side (careful, the hot butter will make the corn grains jump so cover with a lid) until golden brown and crunchy.
Sahtein!
 photo arrow.pngCONTINUE READING
blogger template